|
Reducing RA Periodic Error
|
| The Celestron Advance Series Go-To mount is a copy the well known Vixen mount from Japan, but made in China. The basic design is solid but it needs a little more quality control when it came to assembling the mount at the factory. My mount out of the box wasn't bad at all compared to experiences others have had. I did disassemble it and change the grease to a light weight lithium base so I can use the mount in temps nearing 0°F. I also polished all metal-metal weight bearing contact surfaces, especially in the DEC housing. With all the work, I still wasn't able to get satisfactory guiding using an 2000mm F/10 OTA. The Canon Digital Rebel has a pixel size of 7.4 microns and with the focal length of 2000mm of the F/10 OTA yields a calculated image resolution of 0.76 arc seconds/pixel vs. the 1.52 arc seconds/pixel with the Celestron OTA that comes in at F/5 and 1000mm focal length. The 1000mm F/5 is more forgiving with this pixel resolution, but the 2000mm LX-10 wasn't, even weighing almost 5 pounds less. I had so many bad frames that I gave up imaging through F/10. I know I am pushing the limits of the mounts rating of 35 pounds load capacity when it comes to imaging. I broke the rule of 1/2 the mounts capacity when it came to imagining gear weight. The C8-N w/imaging gear weighs in at 30 pounds total. The LX-10 w/imaging gear weighs in at 25 pounds total. I was never able to get good consistent guide rates to remain under 2 arc seconds though I knew I was asking too much of the mount. The guiding software GuideDog has performed excellent with my configuration. |
|
Lack of funds spawns ingenuity
|
| OK...so I'm not rich. Putting two kids through secondary school has left a lot of dust in my wallet. Even my take home pay doesn't take me home anymore so Losmandy is out of the picture for now. But that hasn't stopped me from wanting to stay in the hobby and have fun. Being in the automobile restoration and show circuit for a number of years, I've become proficient at polishing. I got the idea of taking my mounts RA worm and ring gear and putting it under the polishing wheel with some cutting compound. I figure it will either not have any effect, make it worse, or make it better. To my surprise, it made the mounts PE much better and smoother. |
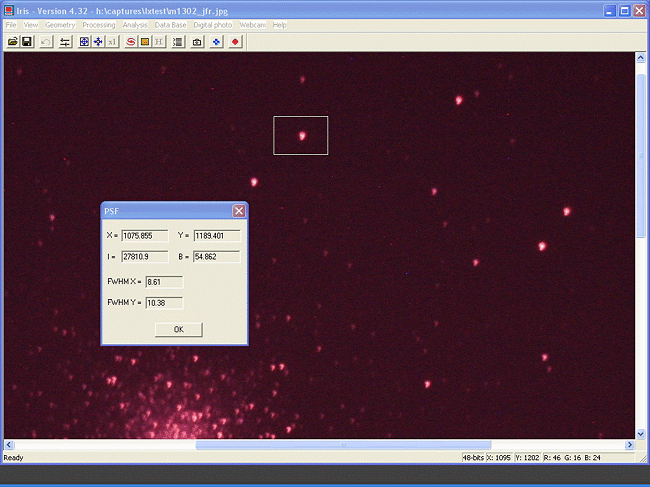
| This is the typical star shapes I got even at just 120 seconds exposures. Notice the big difference in the PSF FWHM X&Y values as well as the often elongated star shapes. This single 2 minute frame of M13 is taken with the Canon Digital Rebel on the LX-10 @ F/10 before the worm gear and ring was polished. I tried various weight balancing techniques but none were able to give me the low guide rates I needed to have round stars at F/10. It was time to reduce the PE humps in the worm gears profile. |
|
|
This is the typical PE that can be maintained easily with auto guiding and this gives me round stars in my images when using the F/5 C8-N reflector OTA with very few bad frames. This is due primarily to the close match of the pixel resolution of the imaging train (1.57 arc seconds/pixel) with the guide camera/scope resolution (1.37 arc seconds/pixel) and the mounts ability to track at 2 arc seconds of error. Guiding is done with GuideDog which provides excellent results considering the over weighted mount. |
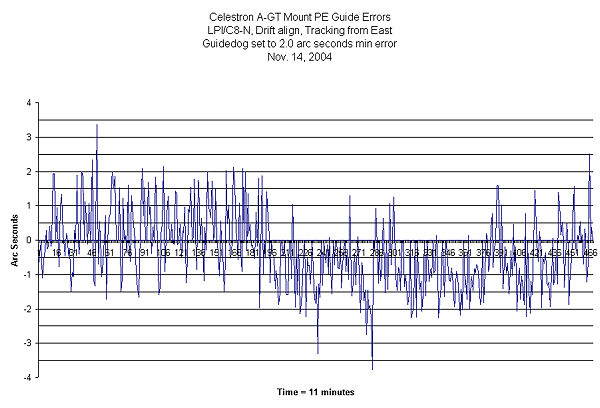
| This is the measured PE done in November 2004. This is close to 40 arc seconds peak-peak using the stock RA worm gear. | 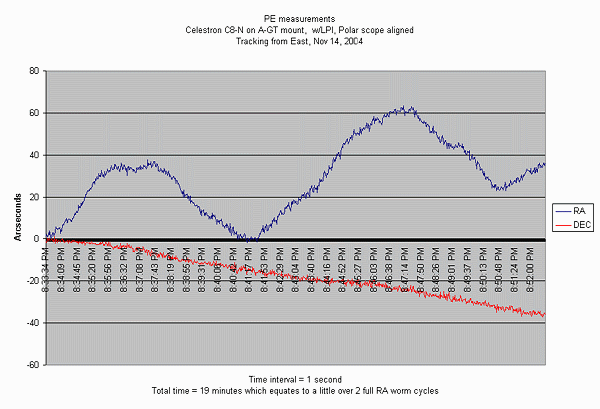
|
|
When I decided to polish the gear, I wanted to take a baseline measurement. Aside from seeing conditions as evident in the jagged slopes, the peak-peak values are close that those measured back in November 2004. |
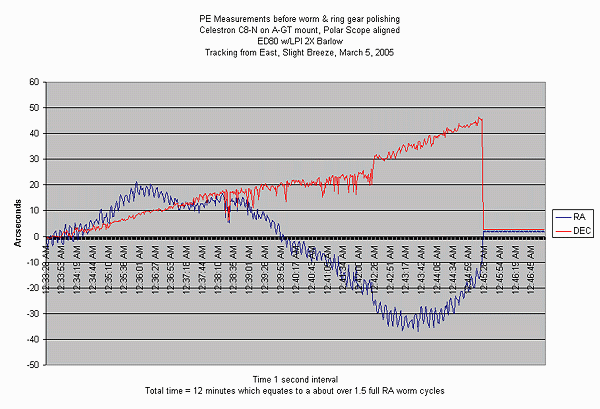
| To my surprise, this was the PE measurements after the RA worm and ring gears were polished. These values are under 10 arc seconds peak-peak and more smoother ramps. But, will it allow the mount to guide under 2 arc seconds to be able to use an F/10 OTA? | 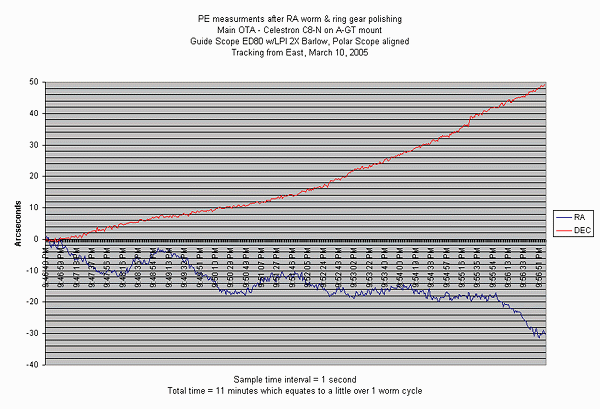
|
|
The verdict is in....Yes!
|
|
|
This is a single 300 second image taken with the LX-10 and Canon 'Rebel. Notice the close PSF FWHM X&Y values. Pixel resolution is 0.76 arc seconds/pixel and guiding is done by GuideDog with full equipment weight. To take 5 minute exposures through the LX-10 on a mount that's loaded past it's recommended imaging limits and produce round stars was not possible before. |
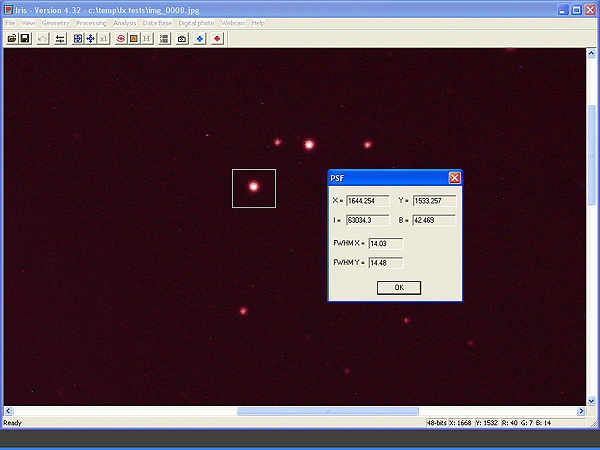
| This is another single 300 second frame from the same test session that shows more round stars. Notice the PSF FWHM X&Y values between the two axis in this window. | 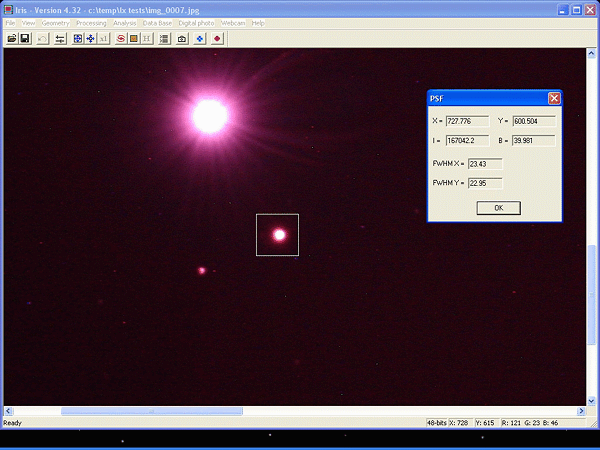
|
|
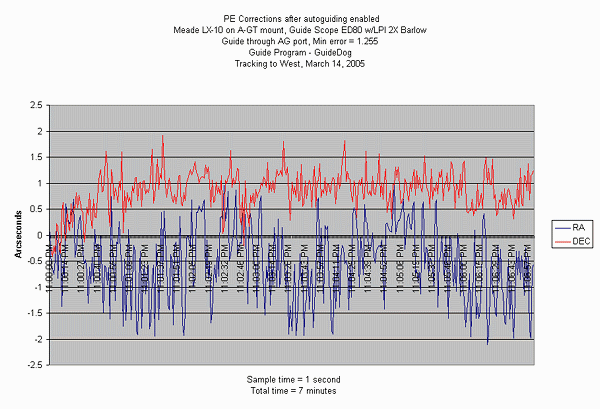
This is the guide errors after polishing the RA worm and ring gear. This is the first time I was able to keep guiding errors down below the 2 arc second range consistently. The guide scope is an Orion ED80 with the Meade LPI and 2X barlow. The resolution of the guide system is calculated to 1.37 arc seconds/pixel vs. the LX-10 resolution of 0.76 arc seconds/pixel. Guide Dog has the ability for sub-pixel guiding as evident by this graph and does a great job on controlling the OTA imaging weight. |
| This is a graph of the PE with auto guiding disabled and then re-enabled. Notice the low PE errors of the polished worm gear. It's no Losmandy, but it sure is close and for a lot less money too. Notice how guiding comes under quick control when the guide program Guide Dog is enabled around the 10:59PM mark. Guiding is through the mounts ST4 compatible guide port using the ShoeString Guide Port Interface adapter. | 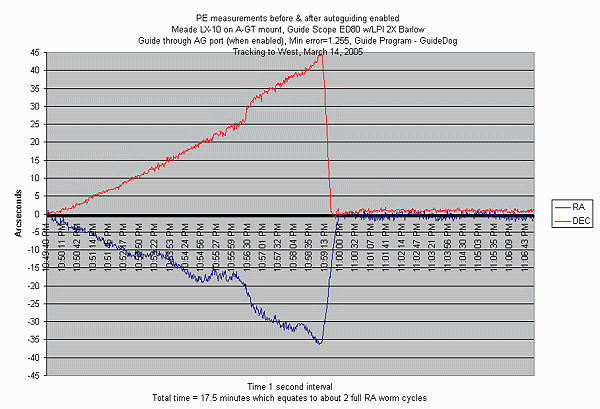
|
|
Summary This mount and current imaging configuration is at it's limits. For the money it's a bargain considering the alternative and I'm happy with the results. Until I get a better mount, I'll keep to the current pixel size of 7.4 microns of the Canon 'Rebel. Anything less will require a better mount when imaging at a longer focal length. I recently took over 50 images through the Orion ED80 at prime focus with the 'Rebel and auto guided through the LX-10, and out of the 50 frames, not one was bad. All had round stars and this was at a image resolution of 2.54 arc seconds/pixel which made the demands on the mount much less due to the shorter focal length. This proves that matching not only the camera to the OTA matters, but also the mounts tracking abilities to the image scale is just as important. Of course seeing conditions will effect resolution to a degree and may allow getting away with larger guide errors before being registered. Procedure in a nut shell For the ring gear, I started to polish at a right angle to the teeth in both directions to get rid of the sharp edges that were on mine. Then work the compound in the direction of the grooves. Apply more compound and reverse direction. The ring gear is some alloy of steel, so the grit will not cut too fast. Do just enough to get rid of any rough or sharp spots. You'll also see a shine appear when the compound is gone. For the worm gear which is made of brass, I worked the compound in the direction of the worm surfaces just enough to begin to see a shine. This is evident when you see the surface turn from black (when the compound is first applied) to a shine. Don't overdo it because brass is soft and cuts down faster than the ring gear. I figure if I overdo it, I can order a new worm from Celestron (what would life be without taking chances). As for grease, I use an automotive light weight black lithium that has worked very well even in temps as low as 10 degrees F. It stays on the gear teeth surfaces excellent and doesn't thicken when cold. I tried the Super Lube, but after a few worm cycles, the teeth were clean of grease and I could feel it wasn't as smooth when turning the worm by hand due to lack of an adequate film. For taking the mount apart, the Astronomy Boy web site has a very well documented procedure. You'll have a make a tool to remove the lock rings on the RA and DEC shafts. I used a piece of 1" oak wood and #10 penny nails. Pine was too soft and allowed the nails to move without loosening the rings and finishing nails bent. Now I can go deep with smaller DSO's and not get frustrated with the results. |